How to put your sideproject online with less than $1
If you are like me, an enthusiast of development, new languages or new frameworks, there’s a high chance that you have a sideproject waiting to be kicked off, and probably because of laziness, lack of time or lack of money, you never put it into production.
Don’t worry, that happens very often.
This post is focused on helping with the main reason which developers are resistant on putting those projects in production: Money.
This is the proposed setup:
- A .com domain of your choice
- A DigitalOcean VPS using Linux (Distro of your choice) with 1 vCPU, 1GB of memory, 25GB SSD and 1TB of transfer.
- A solution that helps you sending emails
- A mailserver with 5GB of space per user, 10 users max.
- A service that provides HTTP (SSL) and cache to your application
Wait? What? All of this for lsess than $6?
Show me the money!
First step: Domain Purchase
Do you usually click on Adwords ads on google searches? Me neither.
But on this case, the main goal is to look at those ads and find our gold pot.
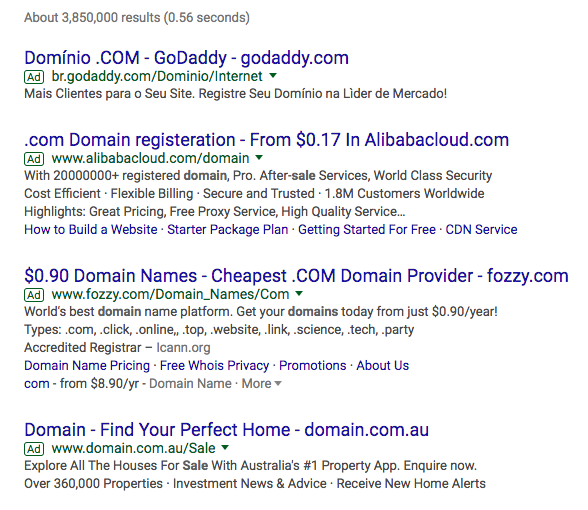
Go to google and type “domain .com sale” and look at the ads:

With this link, we can get even domains for $0.90/yr? Sounds like a deal!
After the checkout steps and process, voala, you have your new .com domaing for $.90 cents!
Current cost : $0.90
Second step: The Server
Have you ever heard about DigitalOcean?
In my opinion, they give you the cheapest and with the best benefits server that you can have.
With only $5 per month, you can have
- 1GB Memory
- 1 vCPU
- 25GB SSD Disk
- 1TB Transfer
But, since i want your success, i’ll give you a DISCOUNT COUPON that gives you $100 for 2 months, so you can use to spin a droplet, create a database for your service, volumes to store files, everything FOR FREE!
After creating an account using the link above, you can create an account and from your control panel, just get a droplet choosing your plan, region and distro.
After creating your droplet, go to the DNS menu and add your domain, putting your droplet’s IP.
Copy the 3 nameservers (NS1.digitalocean.com …) and change on your domain control panel.
Wait a little for the DNS to reflect the changes and Done! You have a domain and a server to run your application! And we spent only $5.90 $0.90!
Current cost : $0.90
Third step: Getting an e-mail service
Pretty much all application need to send e-mails, right? It can be a sign up e-mail or only notifications. So for that we chose MailChimp.
Using the service, you can send 12k e-mails trough SMTP per month, or 250 per hour! FOR FREE!
MailChimp is very simple, you create an account and it’s almost ready.
Current cost : $0.90
Fourth step: Getting a mailbox
On this step, we gonna get a nice mailbox for you, so then you can have a nice [email protected] email.
And for that, we gonna use ZohoMail, which offers us 5GB space per account, limited to 25 accounts and 1 domain FOR FREE
Go ahead and create your account, it’s very easy and simple!
Current cost : $0.90
Fifth step: Getting SSL (https://…)
Is very important to keep your information safe, and having a SSL setted up in our application will help a lot!
We gonna use CloudFlare. It gives us SSL FOR FREE ! (It takes around 48 hours to be activated).
Cloudflare offers us another functions too, as assets cache, optimization, DDoS prevention, you can check everything here
Vamos utilizar a CloudFlare . Ela nos oferece SSL de graça ! ( Demora em torno de 48h para ser ativado) e inúmeras outras funcionalidades como cache de assets, optimização, prevenção contra DDOS. Veja todas as vantagens aqui: https://www.cloudflare.com/overview
After that you need to change your NS servers to cloudflare and some further settings, but everything is explained on each service website.
Current cost : $0.90
Conclusion
Well, it took some time, but after everything you have:
- A .com domain
- A server with 1GB, 1 vCPU and 25GB SSD
- A web application running over HTTPS(SSL) with cache.
- 2 e-mail servers, 1 for SMTP and other for your inbox.
And for how much? $0.90 cents for right now and you gonna start spending money in only 2 months, because you have the $100 coupon that i gave to you!
Have fun!